

I’m sure we all use Git to manage our code, and I’ve found that we all have more or less delayed Git because we’re not familiar with it, for example
- Why did you report detached HEAD again?
- I can’t push it, it’s not fast-forwards, what the hell?
- I want to open source the project I’m working on to GitHub, how can I push it to both my company’s code platform and GitHub?
- How do I do code review on GitLab?
The root cause of this is that you haven’t learned Git systematically, so you just add, commit, pull, and push.
Compared to similar software, Git has many advantages. One of them is that it is very easy to branch and merge versions.
While some traditional version management software actually generates a physical copy of the existing code for branching, Git only generates a pointer to the current version (aka “snapshot”), so it is very fast and easy to use.
However, this convenience can have side effects. If you don’t pay attention, you’re likely to be left with a repository that is sprawling and open, with branches all over the place, and no trace of the main development.
So is there a good branching strategy? The answer is of course yes.
1. Master branch
First, there should be one and only one master branch of the codebase. All official versions available to users are released on this master branch.
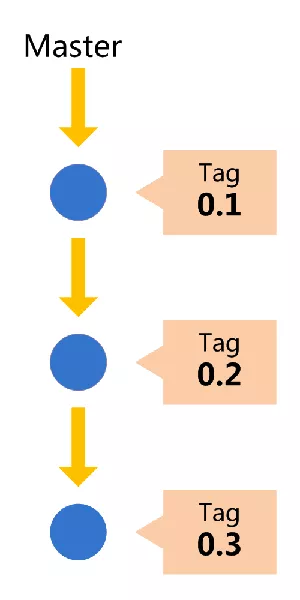
The default name of the Git master branch is Master, and it’s created automatically, so after the repository is initialized, development is done on the master branch by default.
The development branch is called Develop. The master branch is only used for major releases. Daily development should be done on a separate branch. We call the branch for development, Develop.
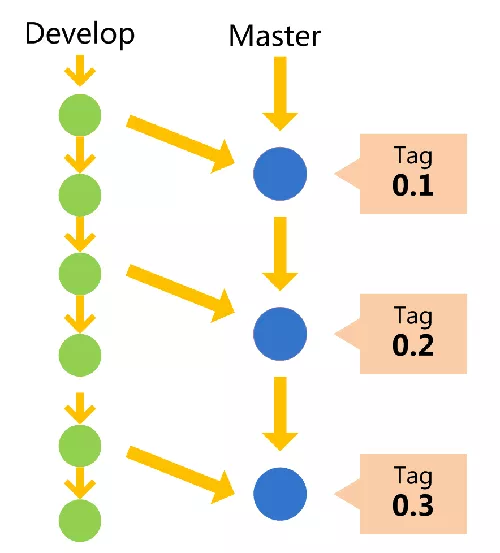
This branch can be used to generate the latest overnight version (nightly) of the code. If you want to release it to the public, you can merge the Develop branch on the Master branch.
The Git command to create a Develop branch is
git checkout -b develop master
The command to publish the Develop branch to the Master branch is
# switch to the master branch
git checkout master
# Merge the Develop branch
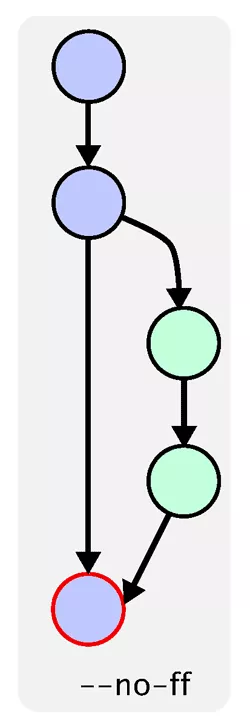
git merge --no-ff develop
Here’s a little explanation of what the --no-ff parameter means in the previous command. By default, Git performs a “fast-farward merge”, which points the Master branch directly to the Develop branch.

With the --no-ff parameter, a normal merge is performed, creating a new node on the Master branch. We prefer this approach for clarity of version evolution.
2. Temporary branches
As mentioned earlier, there are two main branches of the repository: Master and Develop, the former is used for official releases and the latter is used for daily development. In fact, these two branches are sufficient for permanent branches, and nothing else is needed.
However, in addition to the permanent branches, there are also some temporary branches that are used to cope with some specific purposes of version development. There are three main types of temporary branches.
- feature (feature) branches
- pre-release branches
- fixbug branches
All three of these branches are temporary and should be deleted after use, so that the only permanent branches in the codebase are Master and Develop.
Next, let’s look at these three “temporary branches” one by one.
2.1 Feataure branch
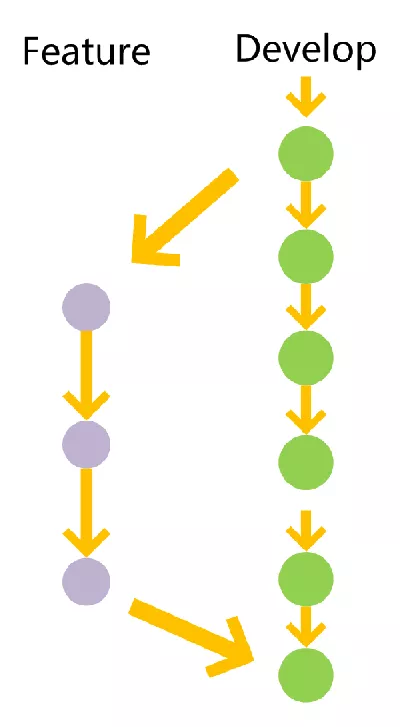
The first is a feature branch, which is a branch that is split off from the Develop branch to develop a specific feature. When the development is finished, it is merged back into the Develop branch.
The name of a feature branch can be in the form of feature-*.
To create a feature branch.
git checkout -b feature-x develop
When development is complete, merge the feature branch into the develop branch: git checkout
git checkout develop
git merge --no-ff feature-x
Delete the feature branch: git branch -d feature-x
git branch -d feature-x
2.2 Pre-release branch
The second type of branch is the pre-release branch, which is where we may need to have a pre-release version to test before releasing the official version (i.e. before merging into the Master branch).
The pre-release branch is split from the Develop branch and must be merged into the Develop and Master branches after the pre-release is finished. It can be named in the form of release-*.
To create a pre-release branch.
git checkout -b release-1.2 develop
Once you’ve verified that there are no problems, merge into the master branch:
git checkout master
git merge --no-ff release-1.2

# Make a tag for the new node created by the merge
git tag -a 1.2
Then merge into the develop branch:
git checkout develop
git merge --no-ff release-1.2
Finally, delete the pre-release branch:
git branch -d release-1.2
2.3 Bugfix branch
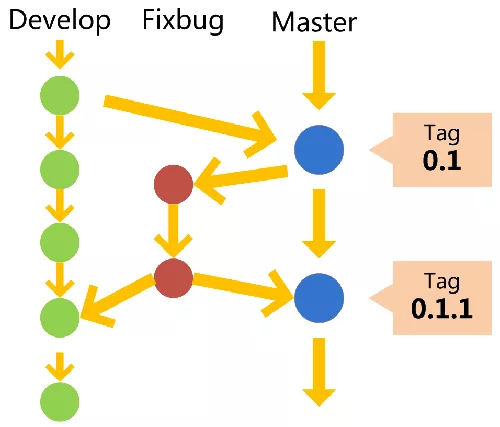
The last type of branch is the bugfix branch. After the software is officially released, it will inevitably have bugs, so you need to create a branch to patch the bugs.
A bugfix branch is a branch that is split off from the master branch. After fixing, it is merged into the Master and Develop branches. It can be named in the form of fixbug-*.
To create a fixbug branch.
git checkout -b fixbug-0.1 master
After the fix is done, merge it into the master branch:
git checkout master
git merge --no-ff fixbug-0.1
git tag -a 0.1.1
Then merge into the develop branch:
git checkout develop
git merge --no-ff fixbug-0.1
Finally, delete the “fixbug branch”:
git branch -d fixbug-0.1